安装WSL

步骤

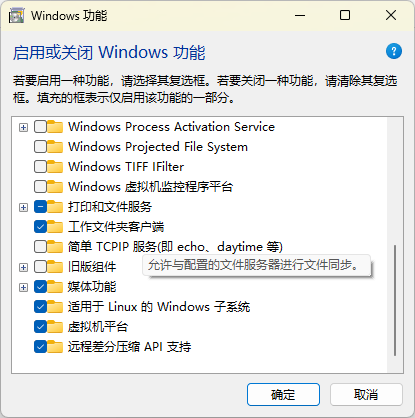
首先,摁下win在搜索栏中搜索 功能,在弹出的窗口下滑找到适用于Linux的Windows子系统和虚拟机平台这两项,并且勾选,随后重启电脑。

随后,打开windows自带的Microsoft store里,搜索想要的linux发行版本,这里我下载的是ubunutu 20.04版本,点击下载,下载后打开,输入你的名称和密码。

或者直接用 PowerShell(ctrl+shift+enter进入管理者模式) 命令安装:

wsl --install -d Ubuntu-20.04

安装完成后,ubuntu 并进行初始化。

可能遇到的问题

在安装完后,打开wsl,可能出现

Installing,this may take a few minutes..
WslRegisterDistribution failedwitherror:0x800701bc
Error:0x800701bc WSL 2 ?????????????????? https://aka.ms/ws12kernel
Press anykey to continue..

这个原因是内核没有更新,只需要用 PowerShell(ctrl+shift+enter进入管理者模式)输入

wsl --update

更新后再打开即可。

这部分可以看Windows11安装WSL2_哔哩哔哩_bilibili这位师傅的教程

兼容32位

wsl默认是 64 位环境,并且不兼容 32 位,所以要先配置 32 位环境.

依次输入

sudo dpkg --add-architecture i386
sudo apt-get update
sudo apt install build-essential
sudo apt install gcc-multilib

基本工具

windows terminal

直接去Microsoft Store搜索

https://apps.microsoft.com/store/detail/windows-terminal/9N0DX20HK701

gdb

sudo apt install gdb

vim

sudo apy install vim

pip

sudo apt install python3 python3-pip python3-dev

其他配置

这里我用的是一步一步配置wsl2 for pwn - Ltfall’s Code这位师傅脚本

这位师傅使用的是roderick师傅的脚本,并进行了一些自定义配置。将其命名为install.sh,使用普通用户权限安装而不是root用户,不要加sudo

#!/bin/bash
# 环境变量
export DEBIAN_FRONTEND=noninteractive
export TZ=Asia/Shanghai
export HUB_DOMAIN=github.com
# 基础包
sudo apt update && sudo apt install -y --fix-missing python3 python3-pip python3-dev lib32z1 \
xinetd curl gcc expect gdb gdbserver g++ git libssl-dev libffi-dev build-essential tmux zstd \
vim netcat tldr liblzma-dev iputils-ping cpio gdb-multiarch file net-tools socat ruby ruby-dev locales \
autoconf automake libtool make zsh openssh-server openssh-client ipython3 \
gdb-multiarch bison

# qemu相关, 需要的话取消注释
# sudo apt install qemu qemu-system qemu-user-static binfmt-support

# ruby包
sudo gem install one_gadget seccomp-tools

# cargo
cargo install pwninit

# python包
python3 -m pip install --upgrade pip && \
pip3 install ropper capstone unicorn keystone-engine z3-solver qiling lief libnum pycryptodome angr trash-cli && \
cd $HOME
export HUB_DOMAIN=github.com
git clone https://${HUB_DOMAIN}/pwndbg/pwndbg && \
cd ./pwndbg && \
./setup.sh && \
cd $HOME && \
git clone https://${HUB_DOMAIN}/hugsy/gef.git && \
git clone https://${HUB_DOMAIN}/RoderickChan/Pwngdb.git && \
git clone https://${HUB_DOMAIN}/Gallopsled/pwntools && \
pip3 install --upgrade --editable ./pwntools && \
git clone https://${HUB_DOMAIN}/RoderickChan/pwncli.git && \
pip3 install --upgrade --editable ./pwncli && \
git clone https://${HUB_DOMAIN}/marin-m/vmlinux-to-elf.git && \
git clone https://${HUB_DOMAIN}/JonathanSalwan/ROPgadget.git && \
python3 ./ROPgadget/setup.py install

# 安装patchelf和r2
git clone https://${HUB_DOMAIN}/NixOS/patchelf.git && \
cd ./patchelf && \
./bootstrap.sh && \
./configure && \
make && \
sudo make install && \
cd $HOME && \
export version=$(curl -s https://api.github.com/repos/radareorg/radare2/releases/latest | grep -P '"tag_name": "(.*)"' -o| awk '{print $2}' | awk -F"\"" '{print $2}') && \
wget https://${HUB_DOMAIN}/radareorg/radare2/releases/download/${version}/radare2_${version}_amd64.deb && \
sudo dpkg -i radare2_${version}_amd64.deb && rm radare2_${version}_amd64.deb


# 配置文件
cat > ~/.tmux.conf << "EOF"
set -g prefix C-a #
unbind C-b # C-b即Ctrl+b键,unbind意味着解除绑定
bind C-a send-prefix # 绑定Ctrl+a为新的指令前缀

# 设置保存的buffer大小
set -g history-limit 5000
# 关闭自动重命名
setw -g automatic-rename off
setw -g allow-rename off
# 增加鼠标支持
set -g mouse on
# 使用vi风格
setw -g mode-keys vi

# 从tmux v1.6版起,支持设置第二个指令前缀
set-option -g prefix2 ` # 设置一个不常用的`键作为指令前缀,按键更快一些
#set-option -g mouse on # 开启鼠标支持
# 修改分屏快捷键
unbind '"'
bind - splitw -v -c '#{pane_current_path}' # 垂直方向新增面板,默认进入当前目录
unbind %
bind \\ splitw -h -c '#{pane_current_path}' # 水平方向新增面板,默认进入当前目录

# 设置面板大小调整快捷键
bind j resize-pane -D 10
bind k resize-pane -U 10
bind h resize-pane -L 10
bind l resize-pane -R 10
bind 1 next-window
EOF

# 安装musl
sudo apt install musl-dev musl-tools
cd $HOME
wget https://musl.libc.org/releases/musl-1.2.3.tar.gz
tar -xvzf musl-1.2.3.tar.gz
cd musl-1.2.3
CC="gcc" CXX="g++" CFLAGS="-g -g3 -ggdb -gdwarf-4 -Og -Wno-error -z now" CXXFLAGS="-g -g3 -ggdb -gdwarf-4 -Og -Wno-error -z now" ./configure --enable-debug --disable-werror
make -j8
sudo make install

# 安装zsh
export HUB_DOMAIN=github.com
sh -c "$(wget -O- https://raw.githubusercontent.com/ohmyzsh/ohmyzsh/master/tools/install.sh)" && \
git clone https://${HUB_DOMAIN}/zsh-users/zsh-autosuggestions $ZSH_CUSTOM/plugins/zsh-autosuggestions && \
git clone https://${HUB_DOMAIN}/zsh-users/zsh-syntax-highlighting $ZSH_CUSTOM/plugins/zsh-syntax-highlighting && \
git clone https://${HUB_DOMAIN}/zsh-users/zsh-completions ${ZSH_CUSTOM:-${ZSH:-~/.oh-my-zsh}/custom}/plugins/zsh-completions


cat > ~/.zshrc << "EOF"
# If you come from bash you might have to change your $PATH.
# export PATH=$HOME/bin:/usr/local/bin:$PATH

# Path to your oh-my-zsh installation.
if [ ! "$TMUX" = "" ]; then export TERM=xterm-256color; fi # auto-suggestion in tmux
export ZSH="$HOME/.oh-my-zsh"
export PATH=$PATH:$HOME/.local/bin:$HOME/.cargo/bin
alias rm='echo "This is not the command you are looking for. Use trash-put instead.";false'
alias trp=trash-put
alias tre=trash-empty
alias trl=trash-list
alias trr=trash-restore
alias trm=trash-rm
alias openaslr="sudo -u root sh -c 'echo 2 >/proc/sys/kernel/randomize_va_space'"
alias closeaslr="sudo -u root sh -c 'echo 0 >/proc/sys/kernel/randomize_va_space'"

# Set name of the theme to load --- if set to "random", it will
# load a random theme each time oh-my-zsh is loaded, in which case,
# to know which specific one was loaded, run: echo $RANDOM_THEME
# See https://github.com/ohmyzsh/ohmyzsh/wiki/Themes
ZSH_THEME="ys"

# Set list of themes to pick from when loading at random
# Setting this variable when ZSH_THEME=random will cause zsh to load
# a theme from this variable instead of looking in $ZSH/themes/
# If set to an empty array, this variable will have no effect.
# ZSH_THEME_RANDOM_CANDIDATES=( "robbyrussell" "agnoster" )

# Uncomment the following line to use case-sensitive completion.
# CASE_SENSITIVE="true"

# Uncomment the following line to use hyphen-insensitive completion.
# Case-sensitive completion must be off. _ and - will be interchangeable.
# HYPHEN_INSENSITIVE="true"

# Uncomment one of the following lines to change the auto-update behavior
# zstyle ':omz:update' mode disabled # disable automatic updates
# zstyle ':omz:update' mode auto # update automatically without asking
# zstyle ':omz:update' mode reminder # just remind me to update when it's time

# Uncomment the following line to change how often to auto-update (in days).
# zstyle ':omz:update' frequency 13

# Uncomment the following line if pasting URLs and other text is messed up.
# DISABLE_MAGIC_FUNCTIONS="true"

# Uncomment the following line to disable colors in ls.
# DISABLE_LS_COLORS="true"

# Uncomment the following line to disable auto-setting terminal title.
# DISABLE_AUTO_TITLE="true"

# Uncomment the following line to enable command auto-correction.
# ENABLE_CORRECTION="true"

# Uncomment the following line to display red dots whilst waiting for completion.
# You can also set it to another string to have that shown instead of the default red dots.
# e.g. COMPLETION_WAITING_DOTS="%F{yellow}waiting...%f"
# Caution: this setting can cause issues with multiline prompts in zsh < 5.7.1 (see #5765)
# COMPLETION_WAITING_DOTS="true"

# Uncomment the following line if you want to disable marking untracked files
# under VCS as dirty. This makes repository status check for large repositories
# much, much faster.
# DISABLE_UNTRACKED_FILES_DIRTY="true"

# Uncomment the following line if you want to change the command execution time
# stamp shown in the history command output.
# You can set one of the optional three formats:
# "mm/dd/yyyy"|"dd.mm.yyyy"|"yyyy-mm-dd"
# or set a custom format using the strftime function format specifications,
# see 'man strftime' for details.
# HIST_STAMPS="mm/dd/yyyy"

# Would you like to use another custom folder than $ZSH/custom?
# ZSH_CUSTOM=/path/to/new-custom-folder

# Which plugins would you like to load?
# Standard plugins can be found in $ZSH/plugins/
# Custom plugins may be added to $ZSH_CUSTOM/plugins/
# Example format: plugins=(rails git textmate ruby lighthouse)
# Add wisely, as too many plugins slow down shell startup.
plugins=(git zsh-syntax-highlighting z sudo extract docker rand-quote tmux colored-man-pages zsh-autosuggestions colorize)

source $ZSH/oh-my-zsh.sh

# User configuration

# export MANPATH="/usr/local/man:$MANPATH"

# You may need to manually set your language environment
# export LANG=en_US.UTF-8

# Preferred editor for local and remote sessions
# if [[ -n $SSH_CONNECTION ]]; then
# export EDITOR='vim'
# else
# export EDITOR='mvim'
# fi

# Compilation flags
# export ARCHFLAGS="-arch x86_64"

# Set personal aliases, overriding those provided by oh-my-zsh libs,
# plugins, and themes. Aliases can be placed here, though oh-my-zsh
# users are encouraged to define aliases within the ZSH_CUSTOM folder.
# For a full list of active aliases, run `alias`.
#
# Example aliases
# alias zshconfig="mate ~/.zshrc"
# alias ohmyzsh="mate ~/.oh-my-zsh"
EOF

seccomp-tools

紧接着上一脚本,就已经装好了seccomp-tools,但我在这里还是贴一下一般的安装方法

sudo apt install gcc ruby-dev
sudo gem install seccomp-tools

seccomp-tools下载及踩过的坑-CSDN博客

one_gadget

类似于seccomp-tools,one_gadget也是ruby里下载的,但是这里的版本过高,所以我下载的是旧版本的one_gadget,过程如下

sudo gem install one_gadget

报错:

ERROR:  Error installing one_gadget:
The last version of elftools (>= 1.0.2, < 1.4.0) to support your Ruby & RubyGems was 1.2.0. Try installing it with `gem install elftools -v 1.2.0` and then running the current command again
elftools requires Ruby version >= 3.1. The current ruby version is 2.7.0.0.

根据报错,输入

sudo gem install elftools -v 1.2.0

再次下载one_gadget,还是报错但是原因不同

sudo gem install one_gadget
ERROR: Error installing one_gadget:
The last version of one_gadget (>= 0) to support your Ruby & RubyGems was 1.9.0. Try installing it with `gem install one_gadget -v 1.9.0`
one_gadget requires Ruby version >= 3.1. The current ruby version is 2.7.0.0.

修改下载命令

sudo gem install one_gadget -v 1.9.0
Fetching elftools-1.1.3.gem
Fetching one_gadget-1.9.0.gem
Successfully installed elftools-1.1.3
Successfully installed one_gadget-1.9.0
Parsing documentation for elftools-1.1.3
Installing ri documentation for elftools-1.1.3
Parsing documentation for one_gadget-1.9.0
Installing ri documentation for one_gadget-1.9.0
Done installing documentation for elftools, one_gadget after 2 seconds
2 gems installed

成功

ropper

得益于上述脚本的帮助,这里我们直接使用pip来下载ropper

pip3 install ropper

接下来的准备

接下来的工具基本上都要用git克隆github上的项目,所以我们输入

sudo -i

进入root模式,再输入vim /etc/hosts,

添加上

140.82.114.3 github.com
140.82.114.3 api.github.com

ROPgadget

git clone https://github.com/JonathanSalwan/ROPgadget.git
cd ROPgadget
sudo python3 setup.py install

这里可能会出现如下报错

~$ ROPgadget
Traceback (most recent call last):
File "/usr/local/bin/ROPgadget", line 4, in <module>
__import__('pkg_resources').run_script('ROPGadget==7.6', 'ROPgadget')
File "/usr/lib/python3/dist-packages/pkg_resources/__init__.py", line 667, in run_script
self.require(requires)[0].run_script(script_name, ns)
File "/usr/lib/python3/dist-packages/pkg_resources/__init__.py", line 1452, in run_script
raise ResolutionError(
pkg_resources.ResolutionError: Script 'scripts/ROPgadget' not found in metadata at '/usr/local/lib/python3.8/dist-packages/ROPGadget-7.6.dist-info'
Error in sys.excepthook:
Traceback (most recent call last):
File "/usr/lib/python3/dist-packages/apport_python_hook.py", line 72, in apport_excepthook
from apport.fileutils import likely_packaged, get_recent_crashes
File "/usr/lib/python3/dist-packages/apport/__init__.py", line 5, in <module>
from apport.report import Report
File "/usr/lib/python3/dist-packages/apport/report.py", line 32, in <module>
import apport.fileutils
File "/usr/lib/python3/dist-packages/apport/fileutils.py", line 12, in <module>
import os, glob, subprocess, os.path, time, pwd, sys, requests_unixsocket
File "/usr/lib/python3/dist-packages/requests_unixsocket/__init__.py", line 1, in <module>
import requests
File "/usr/lib/python3/dist-packages/requests/__init__.py", line 95, in <module>
from urllib3.contrib import pyopenssl
File "/usr/lib/python3/dist-packages/urllib3/contrib/pyopenssl.py", line 46, in <module>
import OpenSSL.SSL
File "/usr/lib/python3/dist-packages/OpenSSL/__init__.py", line 8, in <module>
from OpenSSL import crypto, SSL
File "/usr/lib/python3/dist-packages/OpenSSL/crypto.py", line 1553, in <module>
class X509StoreFlags(object):
File "/usr/lib/python3/dist-packages/OpenSSL/crypto.py", line 1571, in X509StoreFlags
NOTIFY_POLICY = _lib.X509_V_FLAG_NOTIFY_POLICY
AttributeError: module 'lib' has no attribute 'X509_V_FLAG_NOTIFY_POLICY'

Original exception was:
Traceback (most recent call last):
File "/usr/local/bin/ROPgadget", line 4, in <module>
__import__('pkg_resources').run_script('ROPGadget==7.6', 'ROPgadget')
File "/usr/lib/python3/dist-packages/pkg_resources/__init__.py", line 667, in run_script
self.require(requires)[0].run_script(script_name, ns)
File "/usr/lib/python3/dist-packages/pkg_resources/__init__.py", line 1452, in run_script
raise ResolutionError(
pkg_resources.ResolutionError: Script 'scripts/ROPgadget' not found in metadata at '/usr/local/lib/python3.8/dist-packages/ROPGadget-7.6.dist-info'

这里我们需要在ROPgadget的文件夹内输入

sudo cp -r scripts /usr/local/lib/python3.8/dist-packages/ROPGadget-7.6.dist-info

注意点是:这里的/usr/local/lib/python3.8/dist-packages/ROPGadget-7.6.dist-info是不一样的,要修改成你报错里面的地址。

ROPgadget安装及报错解决 - dotExp - 博客园我看的是这位师傅的教程

pwntools

sudo apt-get update
sudo apt-get install python3 python3-pip python3-dev git libssl-dev libffi-dev build-essential
sudo python3 -m pip install --upgrade pip
sudo python3 -m pip install --upgrade pwntools

没什么问题

libcsearcher

git clone https://github.com/lieanu/LibcSearcher.git
cd LibcSearcher
sudo python setup.py develop

没什么问题

glibc-all-in-one

git clone https://github.com/matrix1001/glibc-all-in-one.git
cd glibc-all-in-one
sudo python3 update_list
cat list

执行完sudo python3 update_list后,查看list就可以知道是否下载成功了

patchelf

git clone https://github.com/NixOS/patchelf.git
cd patchelf
./bootstrap.sh
./configure
make
make check
sudo make install

如果./bootstrap.sh报错,可以加上chmod 777 bootstrap.sh后再试一次,或者输入sudo apt-get install autoconf automake libtool

pwndbg

最重量级的一个,其他的报错加起来没这个多

git clone https://github.com/pwndbg/pwndbg
cd pwndbg
./setup.sh

先执行这三部,再输入vim ~/.gdbinit,再gdbinit里输入source /home/用户名/pwndbg/gdbinit.py,

进行测试,输入gdb,发现

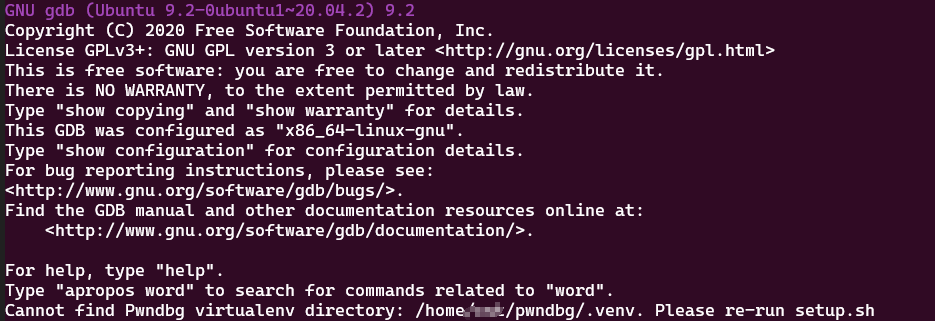
报错提示我们 Cannot find Pwndbg virtualenv directory: /home/pwn/pwndbg/.venv. Please re-run setup.sh

这里我看了这位师傅kali-pwndbg遇到的问题(已解决,亲测有效)_kali安装pwndbg-CSDN博客和ai的处理解决了,

上述博客的师傅指出:

这很有可能是因为安装pwndbg时出现了Creating virtualenv in path: ./.venv ./setup.sh: 行 211: /usr/bin/python3.12: 没有那个文件或目录这句话。

说明你的python3版本不是3.12版本,需要安装python3.12版本。

我们再查看输入./setup.sh的提示

$ ./setup.sh
Hit:1 http://archive.ubuntu.com/ubuntu focal InRelease
Hit:2 http://ppa.launchpad.net/deadsnakes/ppa/ubuntu focal InRelease
Hit:3 http://security.ubuntu.com/ubuntu focal-security InRelease
Hit:4 http://archive.ubuntu.com/ubuntu focal-updates InRelease
Hit:5 http://archive.ubuntu.com/ubuntu focal-backports InRelease
Reading package lists... Done
Building dependency tree
Reading state information... Done
python3-dev is already the newest version (3.8.2-0ubuntu2).
python3-venv is already the newest version (3.8.2-0ubuntu2).
curl is already the newest version (7.68.0-1ubuntu2.25).
gdb is already the newest version (9.2-0ubuntu1~20.04.2).
gdbserver is already the newest version (9.2-0ubuntu1~20.04.2).
git is already the newest version (1:2.25.1-1ubuntu3.14).
libc6-dbg is already the newest version (2.31-0ubuntu9.17).
libglib2.0-dev is already the newest version (2.64.6-1~ubuntu20.04.8).
python3-setuptools is already the newest version (45.2.0-1ubuntu0.2).
0 upgraded, 0 newly installed, 0 to remove and 135 not upgraded.
Hit:1 http://archive.ubuntu.com/ubuntu focal InRelease
Hit:2 http://security.ubuntu.com/ubuntu focal-security InRelease
Hit:3 http://ppa.launchpad.net/deadsnakes/ppa/ubuntu focal InRelease
Hit:4 http://archive.ubuntu.com/ubuntu focal-updates InRelease
Hit:5 http://archive.ubuntu.com/ubuntu focal-backports InRelease
Reading package lists... Done
Building dependency tree
Reading state information... Done
libc6-dbg:i386 is already the newest version (2.31-0ubuntu9.17).
libgcc-s1:i386 is already the newest version (10.5.0-1ubuntu1~20.04).
0 upgraded, 0 newly installed, 0 to remove and 135 not upgraded.
Your system has unsupported python version. Please use older pwndbg release:
'git checkout 2024.08.29' - python3.8, python3.9
'git checkout 2023.07.17' - python3.6, python3.7

看到最后两句,所以我们的解决办法是:

  1. 切换到支持Python 3.8的pwndbg分支

    git checkout 2024.08.29
  2. 清理之前的安装环境(避免旧文件干扰):

    rm -rf venv
  3. 执行

    ./setup.sh

但是这个时候仍旧是不行的,显示如下报错

Installing Poetry (2.1.1): An error occurred. Removing partial environment.
Poetry installation failed.
See /home/pwn/pwndbg/poetry-installer-error-lf5oq39m.log for error logs.

查看具体日志文件 /home/cst/pwndbg/poetry-installer-error-lf5oq39m.log

发现:

ERROR: Could not find a version that satisfies the requirement poetry==2.1.1 (from versions: 0.1.0, 0.2.0, 0.3.0, 0.4.0, 0.4.0.post1, 0.4.1, 0.4.2, 0.5.0b1, 0.5.0b2, 0.5.0, 0.6.0, 0.6.1, 0.6.2, 0.6.3b1, 0.6.3b2, 0.6.3b3, 0.6.3b4, 0.6.3b5, 0.6.3b6, 0.6.3b7, 0.6.3, 0.6.4b1, 0.6.4, 0.6.5, 0.7.0b1, 0.7.0b2, 0.7.0b3, 0.7.0b4, 0.7.0, 0.7.1, 0.8.0a0, 0.8.0a1, 0.8.0a2, 0.8.0a3, 0.8.0a4, 0.8.0, 0.8.1a0, 0.8.1, 0.8.2, 0.8.3, 0.8.4, 0.8.5a0, 0.8.5, 0.8.6, 0.9.0a0, 0.9.0a1, 0.9.0a2, 0.9.0a3, 0.9.0, 0.9.1, 0.10.0a0, 0.10.0a1, 0.10.0a2, 0.10.0a3, 0.10.0, 0.10.1, 0.10.2, 0.10.3, 0.11.0a0, 0.11.0a1, 0.11.0a2, 0.11.0a3, 0.11.0a4, 0.11.0, 0.11.1, 0.11.2, 0.11.3, 0.11.4, 0.11.5, 0.12.0a0, 0.12.0a1, 0.12.0a2, 0.12.0a3, 0.12.0a4, 0.12.0a5, 0.12.0, 0.12.1, 0.12.2, 0.12.3, 0.12.4, 0.12.5, 0.12.6, 0.12.7, 0.12.8, 0.12.9, 0.12.10, 0.12.11, 0.12.12, 0.12.13, 0.12.14, 0.12.15, 0.12.16, 0.12.17, 1.0.0a0, 1.0.0a1, 1.0.0a2, 1.0.0a3, 1.0.0a4, 1.0.0a5, 1.0.0b1, 1.0.0b2, 1.0.0b3, 1.0.0b4, 1.0.0b5, 1.0.0b6, 1.0.0b7, 1.0.0b8, 1.0.0b9, 1.0.0, 1.0.1, 1.0.2, 1.0.3, 1.0.4, 1.0.5, 1.0.6, 1.0.7, 1.0.8, 1.0.9, 1.0.10, 1.1.0a1, 1.1.0a2, 1.1.0a3, 1.1.0b1, 1.1.0b2, 1.1.0b3, 1.1.0b4, 1.1.0rc1, 1.1.0, 1.1.1, 1.1.2, 1.1.3, 1.1.4, 1.1.5, 1.1.6, 1.1.7, 1.1.8, 1.1.9, 1.1.10, 1.1.11, 1.1.12, 1.1.13, 1.1.14, 1.1.15, 1.2.0a1, 1.2.0a2, 1.2.0b1, 1.2.0b2, 1.2.0b3, 1.2.0rc1, 1.2.0rc2, 1.2.0, 1.2.1, 1.2.2, 1.3.0, 1.3.1, 1.3.2, 1.4.0, 1.4.1, 1.4.2, 1.5.0, 1.5.1, 1.6.0, 1.6.1, 1.7.0, 1.7.1, 1.8.0, 1.8.1, 1.8.2, 1.8.3, 1.8.4, 1.8.5)
ERROR: No matching distribution found for poetry==2.1.1

Traceback:

File "<stdin>", line 937, in main
File "<stdin>", line 574, in run
File "<stdin>", line 596, in install
File "<stdin>", line 699, in install_poetry
File "<stdin>", line 389, in pip
File "<stdin>", line 386, in python
File "<stdin>", line 379, in run

ubuntu20.04没有2.1.1这个版本,这里再看这位师傅的视频

WSL2 Pwn环境部署教程_哔哩哔哩_bilibili

时间是2024年112月poetry的版本是1.8.5,所以我们手动安装1.8.5版本的poetry

# 进入 pwndbg 目录
cd ~/pwndbg

# 清理旧环境
rm -rf venv

# 创建新的虚拟环境
python3 -m venv venv

# 激活虚拟环境
source venv/bin/activate

# 手动安装 Poetry
curl -sSL https://install.python-poetry.org | python3 - --version 1.8.5

# 检查 Poetry 版本(应为最新版)
poetry --version

下载完后,输入deactivate退出venv模式,再次输入gdb,即可。


后记:牢死我了,这辈子不想再配环境了。